
Growing mushrooms is one of those hobbies that sneaks up on you. You start with a single grow kit on the kitchen counter, and before you know it, you're converting a spare room into a fruiting chamber and pricing out commercial humidifiers. We've seen it happen hundreds of times.
Whether you're here because you want to grow your own gourmet mushrooms, save money on Lion's Mane at the grocery store, or you're exploring mushroom farming as a side business, this guide covers everything you need to know — from your very first flush to scaling up production. And since we're a Canadian company (CFIA-licensed, out of Brantford, Ontario), everything here is written with Canadian growers in mind.
Why Grow Mushrooms?
There are a lot of reasons people get into mushroom growing. Here are the ones we hear most often:
It's genuinely economical. A single grow kit produces 500g to over a kilogram of fresh mushrooms across multiple flushes. At grocery store prices — especially for specialty species like Lion's Mane or Blue Oyster — that's a solid return for very little effort.
Freshness is everything. The mushrooms you grow at home are incomparably better than what you find wrapped in plastic at the supermarket. Oyster mushrooms start losing their delicate texture within hours of harvest. When you grow your own, you pick them right before you cook them.
It's fast. Unlike a vegetable garden that takes a whole season, most mushroom grow kits produce their first harvest in 7 to 14 days. Fruiting blocks from grain spawn take a few weeks longer, but the turnaround is still remarkably quick.
You can grow year-round. Canadian winters shut down the vegetable garden, but mushrooms thrive indoors. In fact, many species prefer the cooler temperatures we deal with from October through April.
It's deeply satisfying. There's something almost magical about watching a cluster of Blue Oyster mushrooms double in size overnight. Mycology is endlessly fascinating, and growing mushrooms is the most hands-on way to learn it.
Choosing Your Method: Grow Kits vs Grain Spawn vs Liquid Cultures
Think of mushroom growing as a skill tree with three main entry points. Each one gives you more control (and requires more knowledge) than the last.
Grow Kits — The Starting Point
A mushroom grow kit is a fully colonized substrate block, ready to fruit. You cut a hole, mist it, and mushrooms appear. It's the best way to learn the basics of fruiting conditions — humidity, fresh air, light — without worrying about sterile technique or substrate preparation.
Grow kits are not a shortcut or a "lesser" way to grow. They're the smartest way to start — browse our grow kit collection to see what's available. You'll learn more from one successful flush than from reading ten articles.
Grain Spawn — The Middle Ground
Grain spawn is sterilized grain (usually rye or millet) that's been colonized by mushroom mycelium. You mix it into a prepared substrate — pasteurized straw, hardwood sawdust, or supplemented pellets — and the mycelium colonizes the new material. After a few weeks, you have a fruiting block that you've made yourself.
This is where most hobby growers land once they've done a few kits. You get more mushrooms per dollar, you can choose your substrate, and you start to understand what the mycelium actually needs.
Liquid Cultures — Full Control
A liquid culture is living mycelium suspended in a nutrient broth. You use it to inoculate your own grain, which then becomes grain spawn, which you then mix into substrate. This is the full cycle of mushroom cultivation.
Liquid cultures require sterile technique — a still air box or laminar flow hood, proper syringes, and attention to contamination. But they also give you the most control and the lowest cost per kilogram of mushrooms produced.
For a detailed comparison, see our post on grain spawn vs liquid culture.
Species Comparison: What Should You Grow?
Not all mushrooms are created equal. Here's an honest comparison of the species we carry, focused on what matters for home growers in Canada.
| Species | Difficulty | Fruiting Temp | Substrate | Time to Fruit | Flavour Profile |
|---|---|---|---|---|---|
| Blue Oyster | Easy | 10-21°C (50-70°F) | Straw, sawdust, pellets | 5-7 days | Mild, velvety |
| Pink Oyster | Easy | 18-30°C (64-86°F) | Straw, sawdust | 5-7 days | Meaty, bacon-like |
| Lion's Mane | Moderate | 16-20°C (60-68°F) | Hardwood sawdust | 10-14 days | Lobster/crab-like |
| Shiitake | Moderate | 10-21°C (50-70°F) | Hardwood sawdust, logs | 7-14 days | Rich, umami |
| Chestnut | Moderate | 13-18°C (55-64°F) | Hardwood sawdust | 10-14 days | Nutty, crunchy |
For Canadian growers specifically: Blue Oyster is the standout. It thrives in the cooler temperatures typical of Canadian basements, garages, and unheated rooms. Pink Oyster is fantastic but needs warmth — it's a summer species here, or you need a heated space. Lion's Mane does beautifully in the moderate range that most Canadian homes sit at naturally.
For more detail, check out our guide to the best mushrooms for beginners in Canada.
Substrate Options
Substrate is the material your mushrooms grow on — their food source. Different species prefer different substrates, and your choice of substrate affects yield, colonization time, and contamination risk.
Straw
Chopped and pasteurized wheat or oat straw. It's cheap, widely available at farm supply stores across Canada, and works beautifully for all oyster species. Pasteurization is straightforward — you just need hot water and a container. The main downside is that it's messy and bulky.
Hardwood Sawdust
The gold standard for Lion's Mane, Shiitake, and many other wood-loving species. You need sawdust from deciduous trees — oak, maple, beech, or birch all work. Avoid softwoods (pine, cedar, spruce). Sawdust blocks need to be sterilized, not just pasteurized, so this method requires a pressure cooker or autoclave.
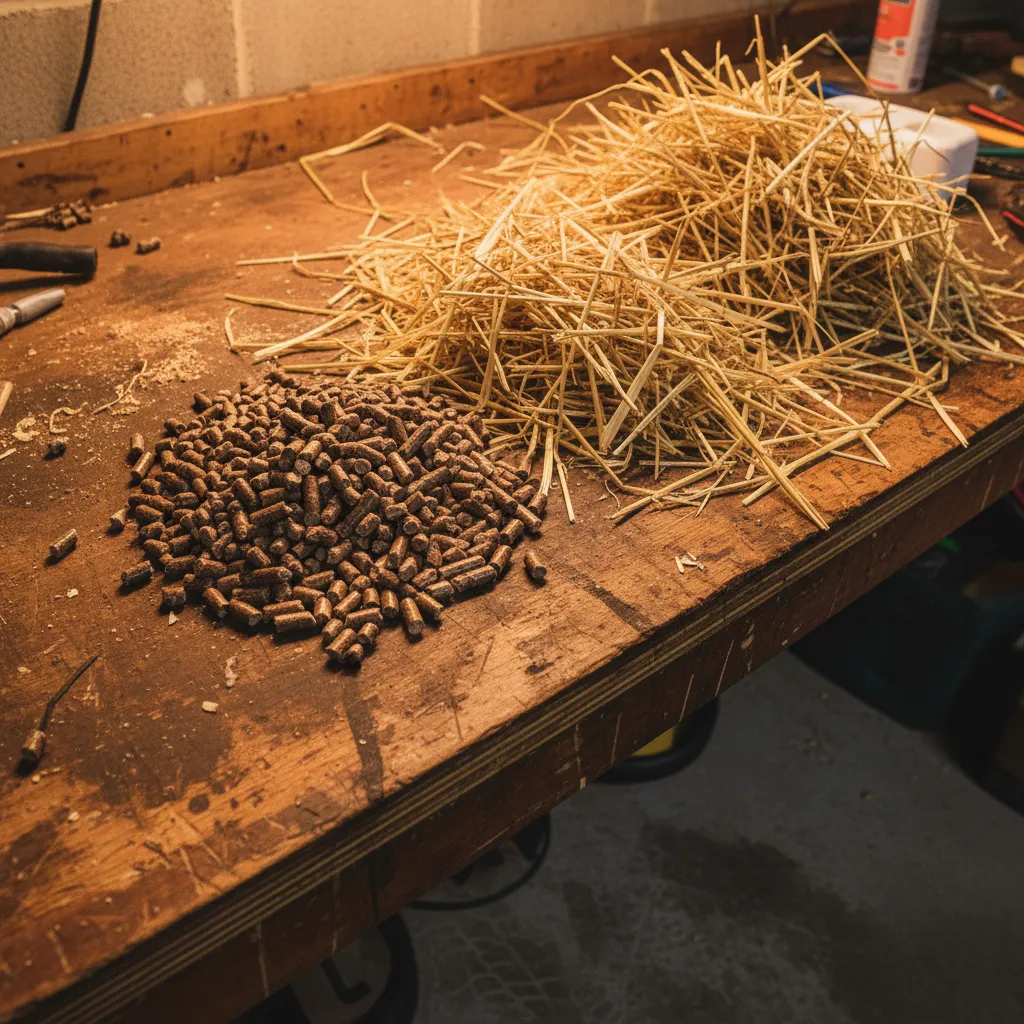
Hardwood Fuel Pellets
This is what most hobby growers actually use instead of raw sawdust. Hardwood fuel pellets (the kind sold for pellet stoves) are essentially compressed sawdust. They're clean, consistent, easy to store, and widely available at Canadian hardware stores. You hydrate them, add supplements if desired, bag them, and sterilize.
Masters Mix
A 50/50 blend of hardwood sawdust and soy hull pellets. This is the substrate used by most commercial gourmet mushroom farms because it produces significantly higher yields than plain sawdust. It does require sterilization and produces a richer substrate that's more prone to contamination if your technique isn't solid.
For a deep dive, read our mushroom substrate guide. If you want precise measurements for your batch, our Bulk Substrate Calculator handles the math for any recipe and block size.
Environmental Requirements
Mushrooms aren't plants. They don't photosynthesize. But they do need specific conditions to fruit well. Get these four factors right and you'll have successful grows consistently.
Temperature
Every species has an optimal fruiting range (see the table above). The most common mistake is growing in a space that's too warm. Canadian basements in winter — typically 15-18°C (59-64°F) — are actually ideal for Blue Oyster, Shiitake, and Lion's Mane. Summer growing requires choosing heat-tolerant species like Pink Oyster, or having air conditioning.
Humidity
This is the single most important factor and where most beginners struggle. Fruiting mushrooms need 80-95% relative humidity. In a Canadian winter, indoor air can drop to 20-30% RH. You need to create a humid microclimate around your growing blocks.
Options range from simple (misting by hand 2-3 times daily, using a humidity tent) to sophisticated (a Martha tent with an ultrasonic humidifier on a timer, or a dedicated grow room with humidity control).
Fresh Air Exchange (FAE)
Mushrooms breathe. They consume oxygen and produce CO2, just like us. If CO2 builds up around the growing block, you'll get long, leggy stems with tiny caps (oysters) or coral-like growth instead of proper teeth (Lion's Mane). You need fresh air, but you also need to maintain humidity. That balance is the core challenge of mushroom cultivation.
Light
Mushrooms need some light — not for energy, but as a directional cue. They grow toward light. A few hours of indirect natural light or a simple LED on a 12/12 timer is plenty. Direct sunlight will dry them out and overheat the substrate.
Step-by-Step: Your First Grow Kit
This is the fastest path from zero to fresh mushrooms. Total time: about 10 days.
What you need:
- A mushroom grow kit (we recommend starting with Blue Oyster)
- A spray bottle with clean water
- A spot with indirect light and moderate temperature
Steps:
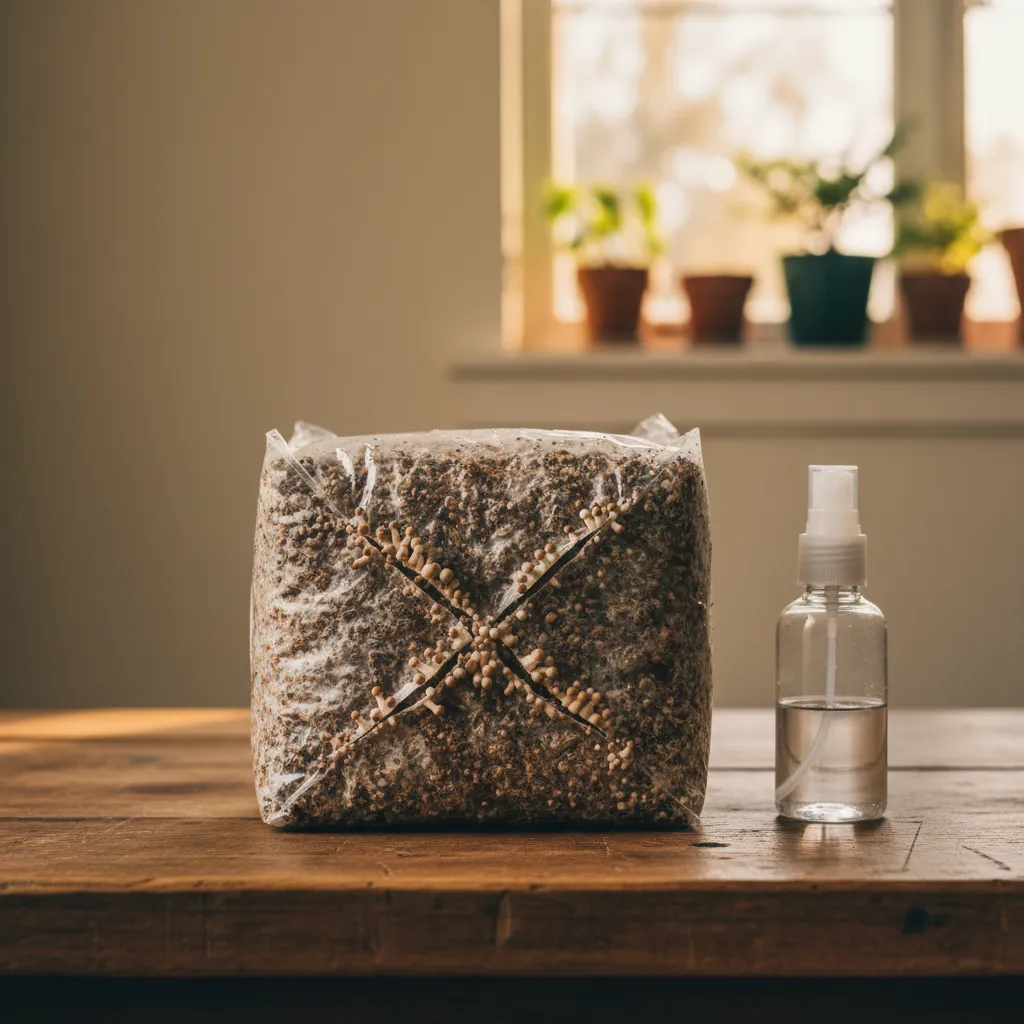
Unbox and inspect. Your kit arrives as a fully colonized block — it should be solid white mycelium throughout. A few small coloured patches on the surface are usually fine, but extensive green, black, or orange mould means contamination. Contact us if anything looks off.
Cut an X. Using a clean knife, cut an X-shaped slit through the bag, about 7-10 cm across. This is where the mushrooms will fruit from. Some growers cut a rectangular flap instead — either works.
Find a spot. Place the kit somewhere with indirect light, reasonable temperature for the species, and away from direct heat sources or drafts. A kitchen counter or shelf works perfectly.
Mist regularly. Spray the opening with water 2-3 times per day. You want the surface to stay moist but not pooling with water. If you're away during the day, consider placing a loose plastic bag over the opening to hold humidity — just make sure it's not airtight.
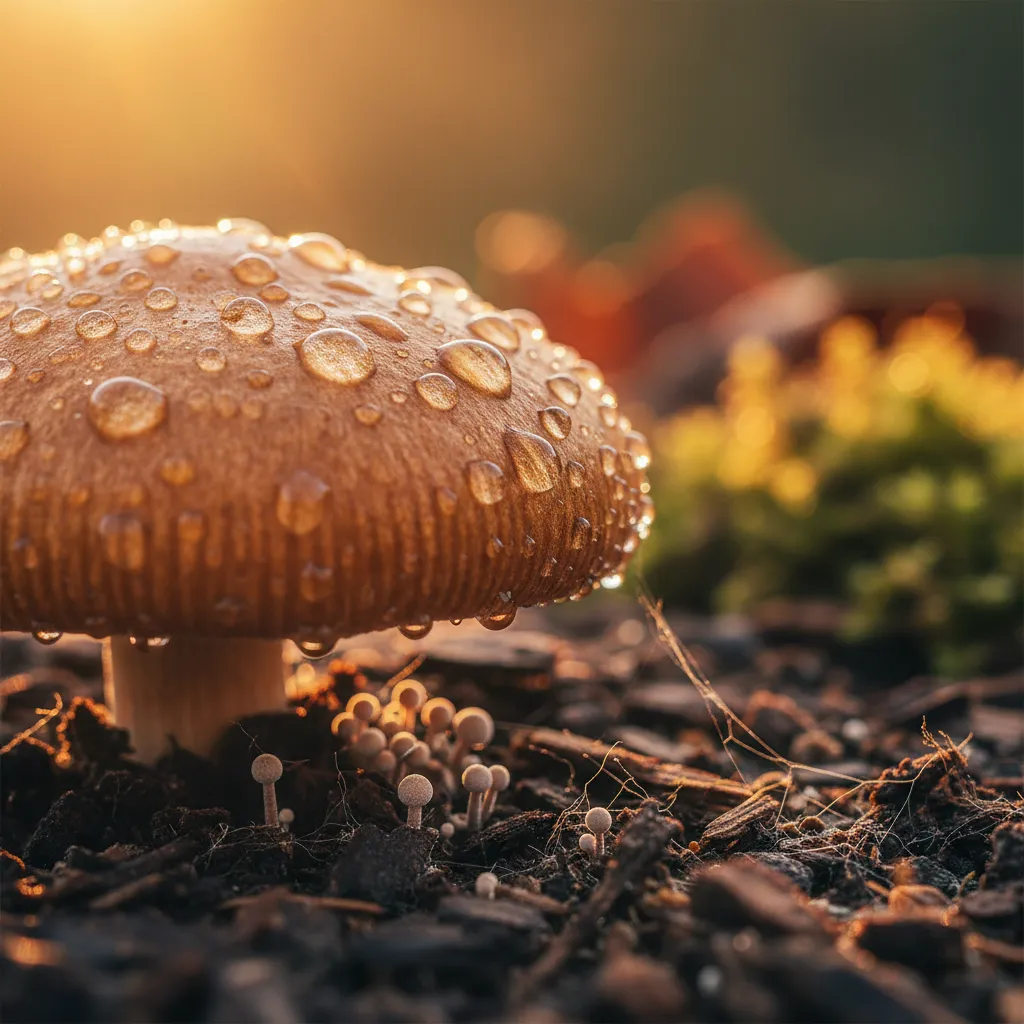
Watch for pins. Within 3-7 days, you'll see tiny bumps forming at the opening — these are primordial knots, or "pins." This is the exciting part. The mushrooms are about to take off.
Let them grow. Over the next 3-5 days, those pins will develop into full-sized mushrooms. Growth is rapid — Blue Oysters can double in size daily.
Harvest. Pick them just before the caps fully flatten out (for oysters) or when the teeth are 1-2 cm long (for Lion's Mane). Twist and pull the entire cluster off at the base.
Rest and repeat. Soak the block in water for a few hours, return it to its spot, and resume misting. Most kits produce 2-3 flushes, sometimes more.
Step-by-Step: Your First Fruiting Block from Spawn
Once you've done a kit or two, this is the natural next step. You're making your own fruiting blocks — more mushrooms, more learning, more satisfaction.
What you need:
- Grain spawn (a 5 lb bag is a good starting quantity)
- Substrate: either pasteurized straw or sterilized hardwood pellet blocks
- Grow bags with filter patches (or bucket with holes for straw)
- A clean workspace
For a straw-based grow (Oysters):
- Chop straw into 5-10 cm lengths. Pasteurize by submerging in 70-80°C (160-175°F) water for 60-90 minutes.
- Drain and cool the straw until it's comfortable to handle (below 27°C / 80°F).
- In a clean container or on a clean surface, mix spawn into the straw at roughly a 10% ratio by weight.
- Pack tightly into grow bags or a 5-gallon bucket with 1 cm holes drilled in a grid pattern.
- Place in your fruiting space. Colonization takes 10-21 days depending on temperature and spawn rate.
- Once fully colonized (all white), introduce fruiting conditions: fresh air, humidity, light.
- Harvest and enjoy.
For a hardwood pellet block (Lion's Mane, Shiitake, Chestnut):
- Hydrate hardwood fuel pellets with boiling water (roughly 2.5 parts pellets to 1 part water by weight — check our substrate guide for exact ratios).
- Add any supplements (wheat bran, soy hulls) at 10-15% by dry weight.
- Bag the mixture in filter-patch grow bags and sterilize in a pressure cooker at 15 PSI for 2-2.5 hours.
- Allow bags to cool completely (12-24 hours).
- In front of a still air box, open each bag, add spawn at 5-10% of substrate weight, seal, and mix thoroughly.
- Incubate at 21-24°C (70-75°F) until fully colonized (2-4 weeks).
- Cut slits for fruiting, move to your fruiting area, and maintain humidity and FAE.
Harvesting and Storage
When to harvest depends on species:
- Oyster mushrooms: When the edges of the caps are still slightly curled downward. Once they flatten completely or turn upward, they're past prime — still edible but with shorter shelf life and spore-dropping can be intense.
- Lion's Mane: When the teeth (spines) are about 1-2 cm long and the mushroom is still bright white. Don't wait for it to turn yellowish.
- Shiitake: When the caps are 70-80% open. The edges should still be slightly rolled under.
Storage: Fresh mushrooms store best in a paper bag in the fridge. Avoid plastic bags — they trap moisture and speed up decay. Most home-grown gourmet mushrooms will keep 7-10 days refrigerated, significantly longer than store-bought because they're fresher to start with.
Preserving: Oysters and Lion's Mane dehydrate beautifully. Dried Lion's Mane rehydrates well for soups and teas. You can also saute mushrooms and freeze them — this works better than freezing them raw.
Scaling Up: From Hobby to Small Farm
A lot of Canadian mushroom farmers started exactly where you are now — with a kit on the kitchen counter. If you're thinking about turning this into something bigger, here's the progression:
Spare room or basement setup. A small Martha tent (a wire shelving unit wrapped in plastic sheeting with a humidifier) can produce 5-10 kg of mushrooms per week. Investment: under $200.
Dedicated grow space. An insulated room or shipping container with humidity control, ventilation, and shelving. You're looking at $1,000-5,000 in setup costs, with potential to produce 20-50+ kg per week.
Farmers' market sales. This is where most small Canadian mushroom farms sell. Gourmet mushrooms command premium prices — $20-35/kg for oysters, $30-50/kg for Lion's Mane at many markets. A small operation can gross $500-2,000 per week at market.
Restaurant and grocery accounts. The next level. Chefs love local mushrooms, especially unusual varieties they can't get from their regular distributors.
At every stage, the economics of making your own spawn from liquid cultures become more compelling. A single syringe of liquid culture can produce enough spawn for hundreds of kilograms of mushrooms. Run your numbers with our Farm Profit Calculator to see projected revenue at different production scales.
Common Mistakes and Troubleshooting
We talk to growers every day. These are the issues that come up most often:
"My block is growing but no mushrooms are forming." Usually a fresh air exchange problem. Mycelium needs a drop in CO2 to trigger pinning. If your block is sealed up tight, crack it open. If you're using a tent, increase ventilation.
"The mushrooms have really long stems and tiny caps." Classic sign of insufficient fresh air. The mushrooms are stretching to find oxygen. Increase FAE immediately — the current flush will look a bit odd, but subsequent flushes will improve.
"Green mould appeared on my block." Green is almost always Trichoderma, the most common competitor. If it's a small patch on a grow kit, you can sometimes cut it away and the block will still fruit. If it's extensive, or if it's on a homemade block that hasn't colonized yet, the block is lost. Review your sterile technique and try again.
"Nothing is happening. No growth at all." Check temperature. If it's too cold (below 10°C / 50°F for most species), mycelium growth slows dramatically. Move to a warmer spot. Also check that your substrate isn't too wet — soggy, waterlogged substrate suffocates mycelium.
"My Lion's Mane looks like a brain or coral instead of having teeth." Too much CO2. Lion's Mane is especially sensitive to CO2 buildup. It needs excellent fresh air exchange to develop proper icicle-like teeth. This is the most common Lion's Mane issue — see our detailed guide on how to grow Lion's Mane for solutions.
"Tiny flies around my grow." Fungus gnats. They're attracted to mushroom mycelium and can be a real nuisance. Prevention is best: keep your growing area clean, use fine mesh over any ventilation openings, and consider sticky traps. They're not dangerous but can introduce contamination.
Growing mushrooms is one of the most rewarding things you can do at home. It's fast, it's fascinating, and the results are genuinely delicious. Start with a grow kit, learn the fundamentals, and grow from there — literally.
If you have questions at any stage, reach out. We're growers too, and we love talking about this stuff.
Browse our full selection of grow kits, grain spawn, liquid cultures, and growing supplies to get started.
Need help with your grow? Dr. MycoThumb is our free AI growing assistant — ask about substrates, contamination, fruiting conditions, or any cultivation question. Available 24/7 in the chat bubble at the bottom-right of every page.