Contamination is the most frustrating part of mushroom growing. You sterilized everything, followed every step, waited weeks for colonization — and then a patch of green or a slimy spot appears and it's all over. Or is it?
Knowing what you're looking at changes everything. Some contamination is immediately fatal to a grow. Some can be managed. Some things that look like contamination aren't contamination at all. This guide covers every common type of mushroom contamination with enough detail that you can identify what you're dealing with, understand where it came from, and take action.
For a deep dive into the most common offender, see our green mold (Trichoderma) guide. This guide covers the full spectrum.
Before We Start: Is It Actually Contamination?
New growers frequently mistake normal mycelial behavior for contamination. Before you panic, check these:
Mycelial metabolites (yellow liquid). Healthy mycelium sometimes produces yellow or amber liquid droplets on its surface. This is mycelium "sweat" — metabolic byproducts. It's normal, especially when the mycelium encounters stress or bacterial microflora it's fighting. Not contamination.
Bruising (blue discoloration). Many species bruise blue or blue-green when physically disturbed. This looks alarmingly like Trichoderma to new growers. The difference: bruising appears where the mycelium was touched or bumped, and it doesn't spread. Rub a Q-tip on it — bruising won't transfer; mold will.
Aerial mycelium (fluffy growth). Some species and strains produce thick, fluffy mycelium that grows upward away from the substrate. This can look alarming compared to the flat, ropey mycelium you expected. If it's white and smells clean, it's just mycelium being mycelium.
Primordia (pins). The very earliest mushroom formations can look like unusual bumps or spots on the mycelium. These are tiny mushroom beginnings — a very good sign, not a problem.
Trichoderma (Green Mold)
The single most common and destructive contaminant in mushroom cultivation.
Appearance
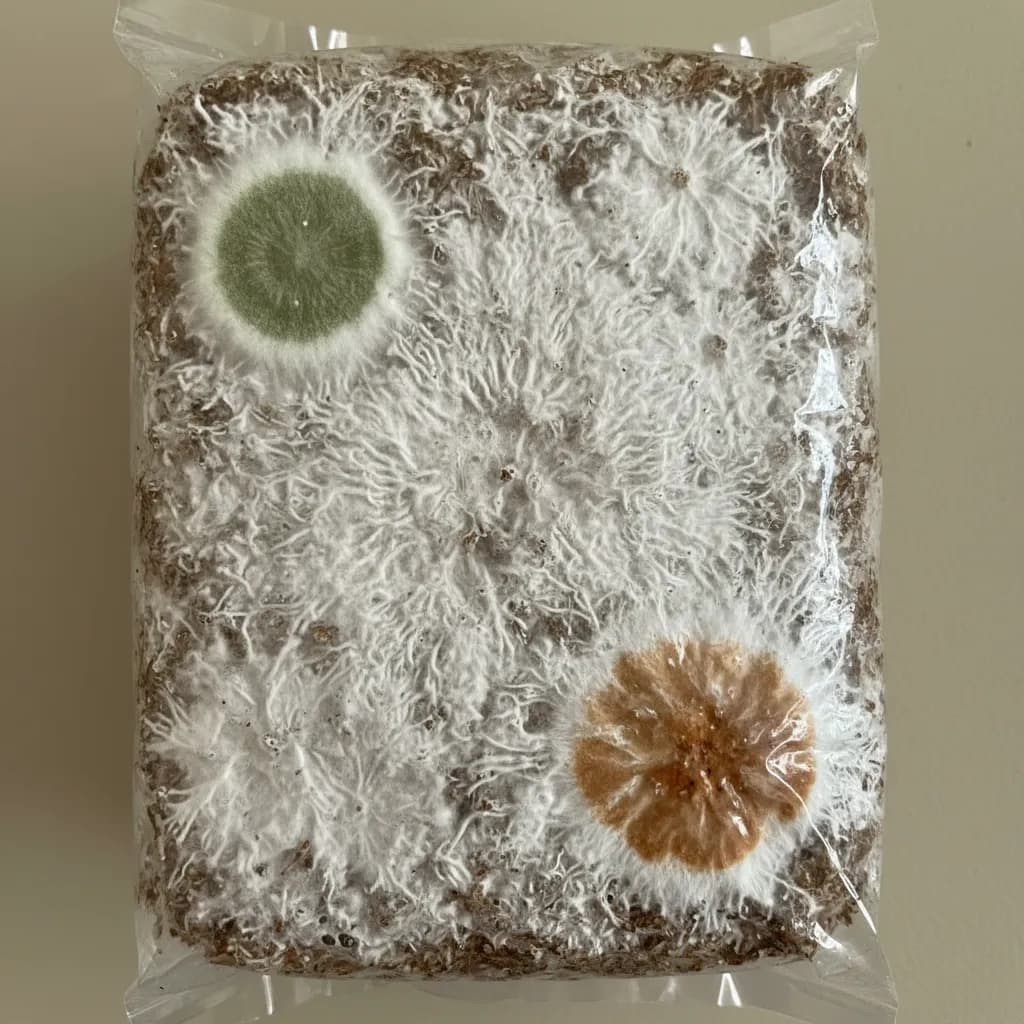
Trichoderma starts as white — which is why it's tricky to catch early. The initial growth looks similar to mushroom mycelium. Within 2-5 days, it develops its characteristic bright green color as it sporulates. The green darkens over time.
Early Trichoderma is white and wispy, growing faster than mushroom mycelium. The transition from white to green happens quickly — often overnight. By the time you see green, the Trichoderma has already produced millions of spores.
How to Distinguish from Mycelium
- Trichoderma grows faster than mushroom mycelium
- The green color is unmistakable once it appears — no mushroom mycelium turns green
- The texture is different: Trichoderma has a fine, powdery appearance when green, versus the ropey or cottony texture of mushroom mycelium
- Trichoderma has a distinctive sharp, chemical smell
Cause
Trichoderma spores are everywhere — in the air, on surfaces, in soil. They're on your hands, your clothes, your substrate materials. The question isn't whether Trichoderma is present — it's whether your sterilization and sterile technique are good enough to prevent it from establishing.
Common entry points:
- Insufficient sterilization of grain or substrate
- Breaks in sterile technique during inoculation
- Contaminated spawn or culture
- Airborne exposure during spawning to bulk
What to Do
If Trichoderma appears before full colonization, the batch is lost. Trichoderma grows faster than mushroom mycelium and will overtake the entire substrate. Do not open the container indoors — the green spores will contaminate your growing space. Seal it and take it outside for disposal.
If Trichoderma appears after full colonization (during fruiting), you may be able to salvage one final flush. The established mycelium can sometimes hold Trichoderma at bay long enough to produce a partial harvest. But don't expect a second flush — remove the block after harvest.
Prevention
- Proper sterilization. 90 minutes at 15 PSI for grain. Proper pasteurization for bulk substrate.
- Clean workspace. Still air box or flow hood for all sterile work. Keep a 4L jug of 70% isopropyl alcohol and a spray bottle on hand at all times.
- Good spawn rates. Higher spawn ratios (15-20%) give mycelium a competitive advantage.
- Avoid supplementation without sterilization. Supplemented substrates (with bran, soy, etc.) must be sterilized, not just pasteurized.
Isopropyl Alcohol 70% — 4 Litre Jug
The cornerstone of contamination prevention. Keep a 4L jug at your workstation and decant into spray bottles as needed. 70% is more effective than 99% for sanitizing surfaces and tools.
View on Amazon.ca →When you buy through our links, it supports our mycology research at no extra cost to you.
Cobweb Mold (Dactylium / Hypomyces)
Appearance
Cobweb mold is grey and wispy, with a distinctly cobweb-like texture — loose, airy strands that look like actual cobwebs laid across the substrate. It grows remarkably fast, often visibly expanding within hours.
How to Distinguish from Mycelium
- Cobweb mold is grey, not white. The color difference is subtle but consistent.
- The texture is very loose and airy — like pulling apart cotton candy. Mycelium tends to be denser and more uniform.
- Cobweb mold grows extremely fast — visibly faster than any mushroom mycelium. If a grey fuzz covers a large area overnight, it's cobweb.
Cause
Cobweb mold thrives in conditions of high humidity with poor air circulation — exactly the conditions inside a sealed fruiting chamber with no air exchange. It's essentially a sign that your FAE is insufficient.
What to Do
Cobweb mold is one of the few contaminants you can actually treat. Spray the affected area directly with 3% hydrogen peroxide (standard drugstore concentration). The hydrogen peroxide kills cobweb mold on contact. You'll see the grey growth dissolve almost immediately.
After treating, increase your fresh air exchange. Open the monotub and fan more frequently, or adjust the polyfill to allow more airflow. Cobweb mold cannot survive in well-ventilated conditions.
Prevention
Adequate FAE. That's it. Cobweb mold is almost always a ventilation problem.
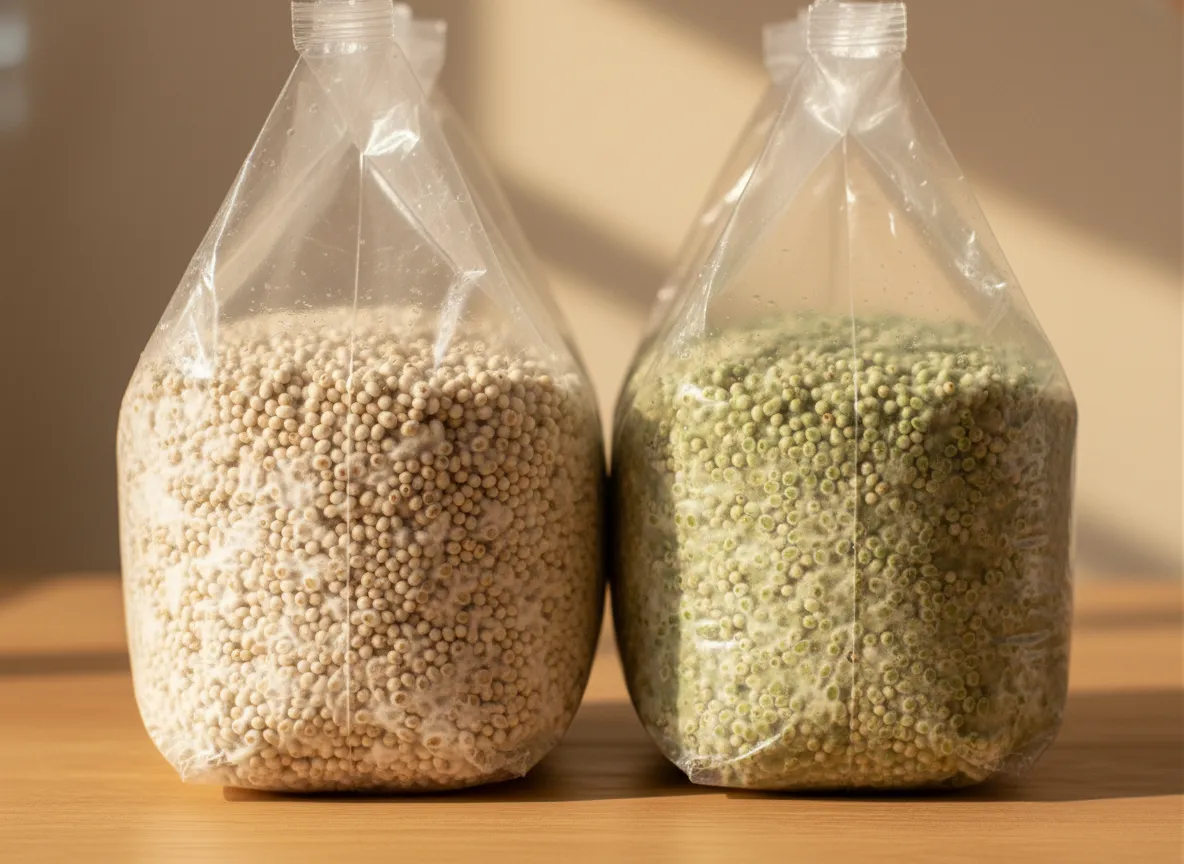
Penicillium (Blue-Green Mold)
Appearance
Penicillium appears as blue-green to teal patches, often with a powdery, dusty texture. It looks similar to Trichoderma but trends more toward blue than pure green. The edges are often white (the growing front) with the blue-green color concentrated in the centre (where it's sporulating).
How to Distinguish from Trichoderma
- Penicillium is more blue-green or teal, versus Trichoderma's bright grass-green
- Penicillium growth is typically slower than Trichoderma
- Penicillium often appears on agar plates and grain jars; Trichoderma is more common on bulk substrate
The treatment is the same for both: if it's in your jar or substrate, the batch is compromised.
Cause
Airborne spores landing on exposed substrate or cultures. Penicillium is extremely common in household environments — it's the mold you see on forgotten bread or fruit.
What to Do
Discard contaminated jars or bags. On agar plates, you can sometimes save a clean culture by transferring from the leading edge of the mycelium away from the Penicillium.
Black Mold (Aspergillus niger)
Appearance
Black or very dark green, nearly black spore masses. Dense and powdery. Often appears as dark spots on grain jars, agar, or substrate.
Health Warning
Aspergillus niger produces spores that are harmful to inhale. If you see black mold in a jar or bag, do not open it indoors. Seal it, take it outside, and discard. This is not a "let's wait and see" situation.
Cause
Like all mold contamination: insufficient sterilization, break in sterile technique, or contaminated starting materials.
What to Do
Discard immediately. Do not attempt to salvage. Clean the area where the contaminated container was stored with a bleach solution.
Lipstick Mold (Sporendonema purpurescens)
Appearance
Bright orange to pinkish-red patches, sometimes described as looking like lipstick smeared on the substrate. It's distinctive and hard to confuse with anything else.
Cause
Lipstick mold commonly appears on grain spawn, particularly in jars or bags that were understerilized. It's less common than Trichoderma or Penicillium but memorable when it shows up because of the vivid color.
What to Do
Discard contaminated grain. Lipstick mold indicates your sterilization process needs attention — review your pressure, time, and grain moisture levels. Grains that are too wet before sterilization are more prone to lipstick mold.
Wet Spot / Bacillus (Bacterial Contamination)
Appearance
Wet, slimy, glossy patches on grain. The grain in the affected area looks water-logged and slightly translucent. The surrounding grain may appear normal, but the wet area doesn't colonize — mycelium grows around it but won't penetrate it.
Bacterial contamination often has no visible color — it's clear or slightly grey. The key indicator is the smell: sour, fermented, sweet, or like wet socks. Healthy grain and mycelium should smell clean and mushroomy.
Cause
- Overhydrated grain that created an anaerobic pocket where Bacillus bacteria thrive
- Insufficient sterilization — Bacillus forms heat-resistant endospores that can survive short or low-pressure sterilization
- Too much liquid during inoculation — injecting 3-5 cc of liquid culture into a jar creates a wet zone
What to Do
Individual wet spots in an otherwise healthy jar sometimes get overtaken by the mycelium as it grows. If the wet spot is small (less than 10% of the jar) and the mycelium is growing vigorously, you can sometimes wait it out.
If the wet spot is large, growing, or smells strongly sour, discard the jar. Bacterial contamination won't improve over time and will transfer if you use the jar for grain-to-grain transfers.
Prevention
- Dry your grain properly before loading jars. External moisture should be minimal.
- Don't over-inject. Use 1-2 cc of liquid culture per quart jar, not more.
- Full sterilization time. 90 minutes at 15 PSI minimum for grain.
Sour Rot / Fermentation
Appearance
No distinct visual indicators in early stages. The grain or substrate may look slightly off-color (yellowish or brownish tinge) but the primary indicator is smell — a strong sour, vinegary, or beer-like odor when the container is opened.
Cause
Anaerobic conditions from excessive moisture. The grain or substrate is too wet for mushroom mycelium but perfect for fermentation bacteria. This is almost always a moisture problem during grain prep or substrate hydration.
What to Do
Discard. Sour rot means the substrate has been taken over by bacteria. Even if mycelium eventually establishes, the metabolic byproducts from the bacterial activity will inhibit healthy growth and potentially produce off-flavours in any mushrooms that do form.
Prevention
Master the field capacity test. Every time, every batch. Getting moisture right eliminates 90% of bacterial contamination issues.
Yeast
Appearance
Creamy white, tan, or yellowish patches with a slippery or glossy surface. Yeast colonies are smoother and more uniform than mycelium, lacking the ropey or branching texture of fungal hyphae.
Cause
Yeast contamination is common on agar plates and in liquid culture. It enters through breaks in sterile technique — floating in on air currents, transferred from unsterile tools, or present in contaminated starter cultures.
What to Do
On agar: transfer clean mycelium away from the yeast colony onto a fresh plate. Yeast and mycelium grow at different rates and in different patterns, so you can usually isolate the mushroom culture.
In liquid culture: discard. Yeast in LC is nearly impossible to remove because both organisms are suspended in the same liquid. Start a new LC from a clean agar plate.
Contamination Prevention: The Big Picture
Every contamination event traces back to one of three causes:
1. Insufficient Sterilization
Your pressure cooker didn't reach proper pressure, didn't hold it long enough, or your grain/substrate was too dense for heat to penetrate evenly. Solution: calibrate your pressure cooker, verify with a gauge, and don't cut corners on time. 90 minutes at 15 PSI for grain. 2-2.5 hours for supplemented substrates.
2. Break in Sterile Technique
Something non-sterile touched your sterile work. A jar lid was set on a dirty surface. You didn't flame your scalpel. You rushed and moved too fast in the SAB. A door opened and created a draft. Solution: slow down, be methodical, and review your technique honestly after every contamination event.
3. Contaminated Starting Material
Your liquid culture, agar plate, or spawn was already contaminated when you started. This is especially common with spore syringes (which are not sterile by nature) and with cultures that have been through too many grain-to-grain transfers. Solution: work from known-clean cultures, use agar as an intermediate to verify cleanliness before committing to grain, and don't push G2G generations beyond 3-5.
When to Salvage vs When to Toss
| Contamination | Fully Colonized? | Action |
|---|---|---|
| Trichoderma (green mold) | No | Discard |
| Trichoderma (green mold) | Yes | Harvest once, then discard |
| Cobweb mold | Any stage | Treat with H2O2, increase FAE |
| Penicillium | No | Discard |
| Black mold | Any stage | Discard immediately, don't open indoors |
| Lipstick mold | Any stage | Discard |
| Wet spot (small) | Colonizing | Monitor — may resolve |
| Wet spot (large) | Any stage | Discard |
| Sour rot | Any stage | Discard |
The golden rule: When in doubt, throw it out. A contaminated jar or tub isn't worth the risk of spreading spores to your growing area. The cost of one batch of substrate is far less than the cost of decontaminating a room.
Building a Contamination-Free Practice
Contamination isn't failure — it's feedback. Every experienced grower has lost batches. What separates successful growers is that they treat each contamination event as diagnostic information:
- What type of contamination was it?
- At what stage did it appear?
- What was different about this batch?
- Where in the process could the break have occurred?
Keep a simple log. Over time, patterns emerge. Maybe your jars contaminate when you do large batches (fatigue leads to sloppy technique). Maybe contamination increases in summer (higher ambient spore counts). Maybe one spot in your house is worse than others.
The tools to win this fight are simple: a clean workspace, proper sterilization, nitrile gloves, good technique, and honest self-assessment when things go wrong. Nail those, and contamination becomes a rare annoyance rather than a constant problem.
Need help identifying contamination right now? Dr. MycoThumb is our free AI growing assistant — describe what you see (or upload a photo with Platinum) and get an instant diagnosis. Available 24/7 in the chat bubble at the bottom-right of every page.