The monotub is the workhorse of home mushroom cultivation. One tub, one substrate batch, and minimal daily maintenance can produce kilograms of fresh gourmet mushrooms per flush. If you've been growing from kits and you're ready for a serious upgrade in yield, the monotub is your next step.
We've run monotubs in basements, spare bedrooms, garages, and closets across Canada. They're cheap to build, reliable once dialed in, and the skills you learn translate directly to larger-scale growing. This guide covers everything from tub selection through harvest.
What Is a Monotub?
A monotub is a large clear plastic tub used as both a colonization chamber and a fruiting chamber for mushrooms. You fill it with a mix of bulk substrate and colonized grain spawn, let the mycelium colonize the entire substrate, and then trigger fruiting conditions. The mushrooms grow directly inside the tub.
The name "mono" comes from the fact that it's a single self-contained unit — colonization and fruiting happen in the same container. No transferring cakes to a separate chamber like with PF Tek.
There are two main styles:
Modified Monotub
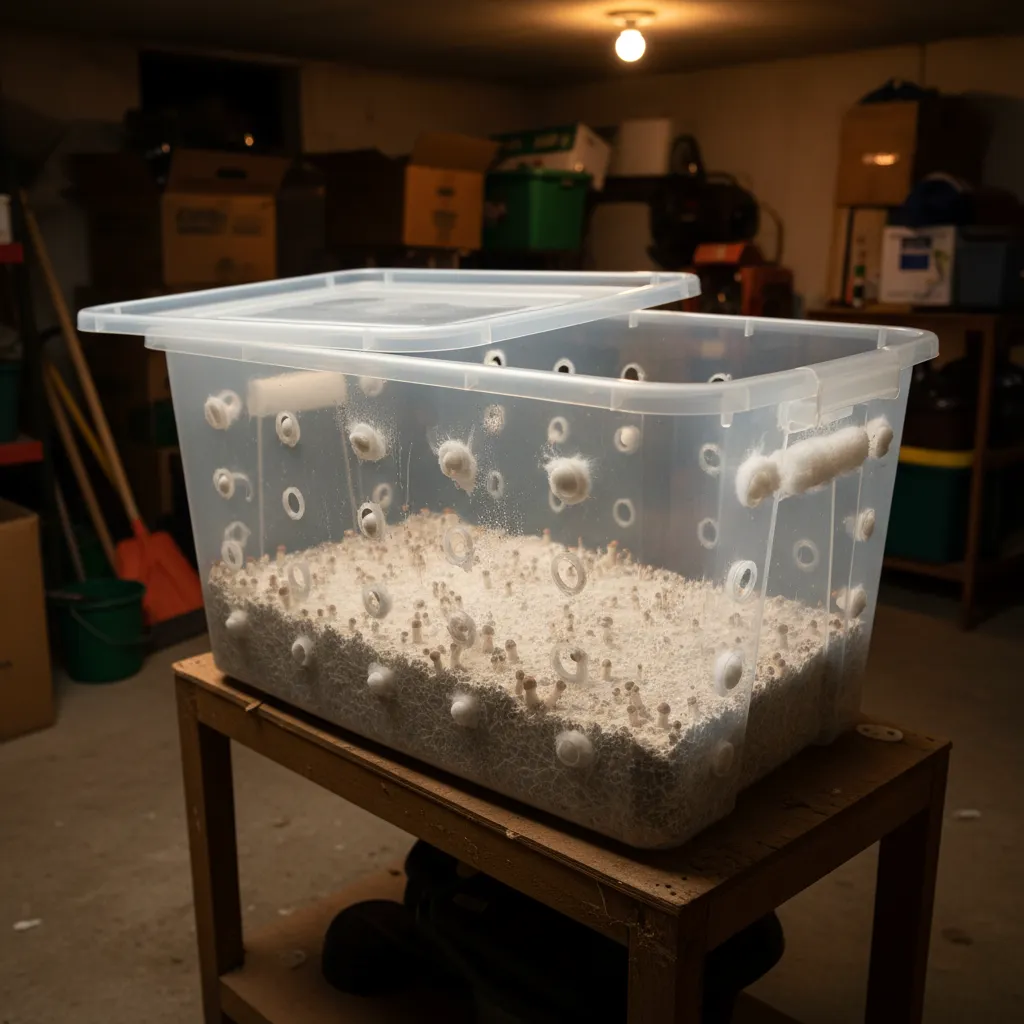
A modified monotub has holes drilled in the sides, stuffed with polyfill or covered with micropore tape. These holes provide passive fresh air exchange (FAE) — the polyfill acts as a filter, letting air through while blocking contaminants. Modified tubs are largely hands-off once set up.
Unmodified Monotub
An unmodified monotub has no holes at all. Instead, you manage FAE by flipping or cracking the lid. During colonization, the lid is latched shut. During fruiting, you either flip the lid upside down (creating gaps at the corners) or offset it slightly to allow air exchange.
Which should you choose? For beginners, we actually recommend the unmodified approach. It's simpler (no drilling), easier to adjust, and you can always add holes later. Modified tubs are slightly more hands-off during fruiting but require more planning upfront.
Tub Selection
You want a clear plastic storage tub in the 64-106 quart (60-100 litre) range. Here's what to look for:
Size: 64 qt is a good starting size. 106 qt gives you more substrate volume and higher yields but requires more spawn. The Sterilite brand tubs from Canadian Tire or Walmart are popular choices.
Clarity: The tub must be clear or at least translucent. You need to see what's happening inside without opening the lid. Opaque tubs work technically but make it impossible to monitor colonization and spot contamination early.
Lid fit: The lid should snap securely but not be airtight. A little flex is fine — you're not building a pressure vessel.
Height: Taller is generally better. You want at least 30 cm (12 inches) of interior height. This gives space for the substrate layer (7-13 cm) plus headroom for mushrooms to grow upward without pressing against the lid.
Building a Modified Monotub
If you want the modified version, here's the hole placement that works well for a standard 64 qt tub.
Hole Placement
Side holes (FAE): Drill two holes on each long side, roughly 10 cm (4 inches) above the bottom of the tub. Space them evenly. Use a 5 cm (2 inch) hole saw. That's four holes total — two per long side.
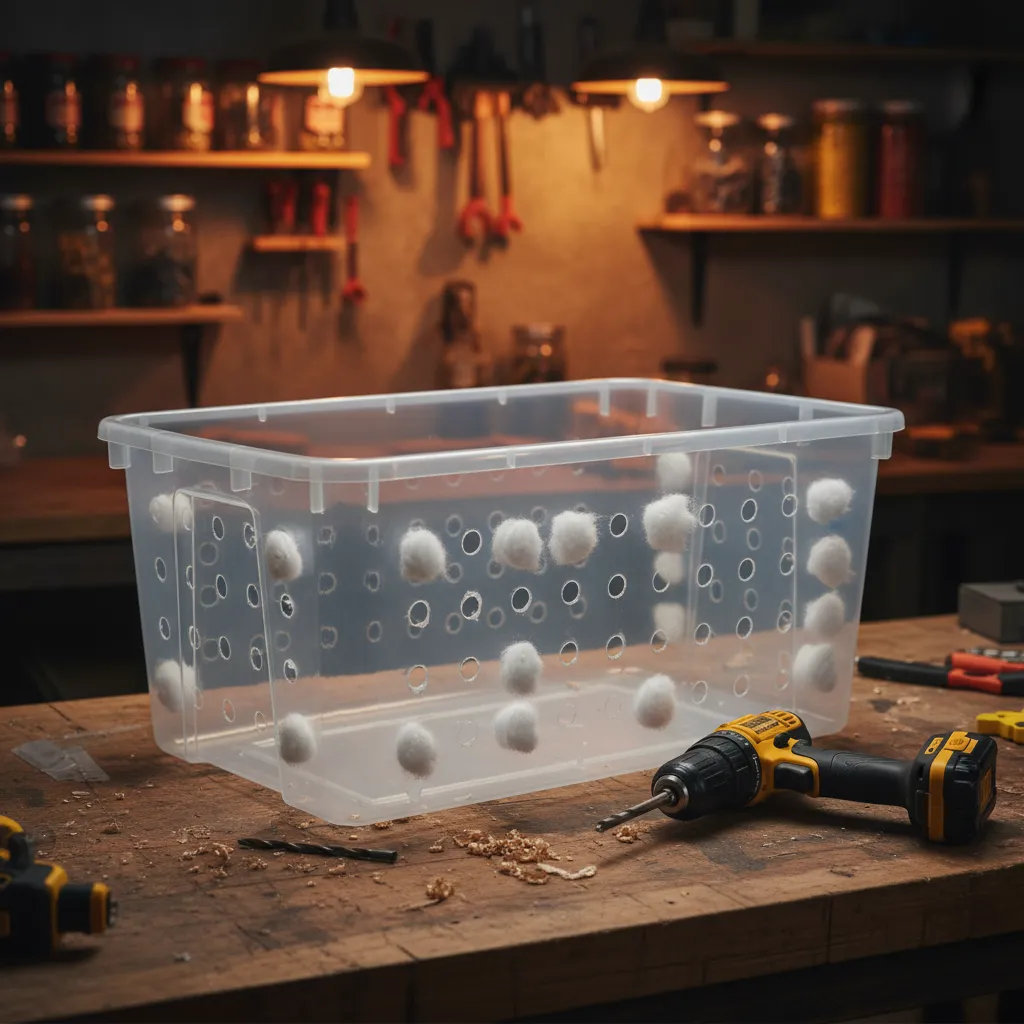
Position matters: The holes need to be above the substrate line. If your substrate is 10 cm deep, the hole centres should be at least 12-13 cm from the bottom. Holes below the substrate line will leak moisture and create a mess.
Some growers add additional holes higher up on the short sides or in the lid for more air exchange. For most species and most Canadian homes, four side holes are sufficient to start. You can always add more if you're seeing fuzzy feet (elongated, fuzzy stems — a sign of insufficient FAE).
Polyfill vs Micropore Tape
Polyfill (polyester fiberfill): Stuff each hole loosely with polyfill — the same material used to stuff pillows and toys. Available at any fabric or craft store. Push it in loosely enough that air can pass through, but tight enough that you can see the fibres creating a dense filter. The polyfill traps contaminant particles while allowing gas exchange.
How tight? Start with a moderate pack. If you're getting too much moisture loss (substrate drying out), pack it tighter. If you're seeing fuzzy stems, loosen it up or pull some out.
Micropore tape: Medical micropore tape (3M brand, available at any pharmacy) is an alternative. Cover each hole with several layers of micropore tape. It provides a more consistent filtration than polyfill but is harder to adjust. Some growers use micropore tape on the outside of the hole with a small piece of polyfill inside — belt and suspenders.
TempPro TP50 Digital Hygrometer & Thermometer
Monitor humidity and temperature inside your monotub at a glance. The max/min records feature lets you track conditions even when you're not checking.
View on Amazon.ca →When you buy through our links, it supports our mycology research at no extra cost to you.
Spawning Your Monotub
Spawn-to-Substrate Ratio
The standard ratio is 1:2 to 1:4 spawn to substrate by volume. A 1:2 ratio (one part spawn, two parts substrate) colonizes faster and resists contamination better. A 1:4 ratio uses less spawn but takes longer.
For a 64 qt tub, you'll need roughly:
- 1:2 ratio: 4-5 quarts of colonized grain spawn + 8-10 quarts of substrate
- 1:3 ratio: 3-4 quarts of colonized grain spawn + 9-12 quarts of substrate
Your total volume should fill the tub to a depth of 7-13 cm (3-5 inches). Thinner substrates colonize faster but dry out more quickly. Thicker substrates hold moisture better and produce more per flush but take longer to colonize.
The Process
Prepare your bulk substrate. CVG is the most common choice for monotubs. Make sure it's at field capacity and cooled below 27°C (80°F).
Break up your grain spawn. Shake or manually break the colonized grain so the kernels separate. This distributes inoculation points throughout the substrate.
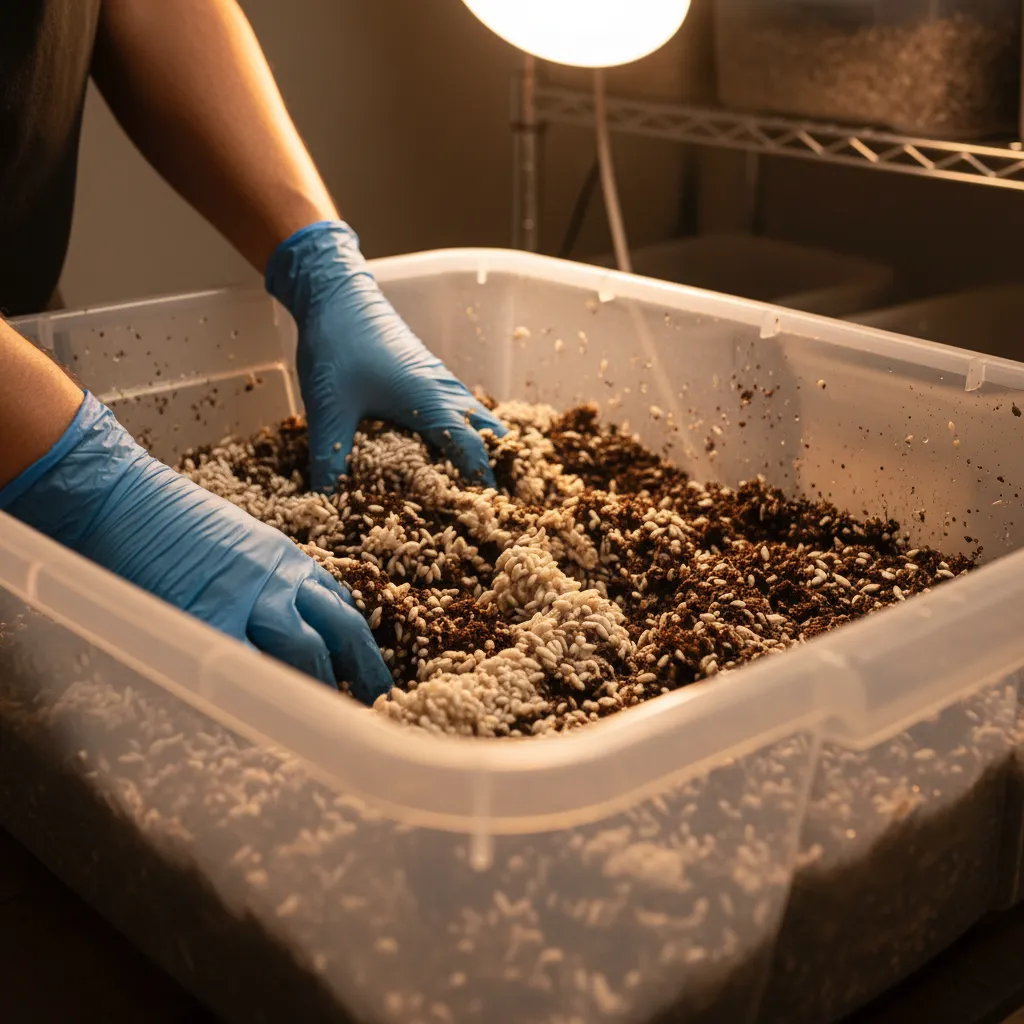
Mix in a clean container. Combine spawn and substrate in a sanitized tub or bucket. Mix thoroughly with clean, gloved hands so the grain is evenly distributed.
Transfer to your monotub. If you're using a liner (a black garbage bag fitted inside the tub), set that up first. Pour the spawn-substrate mix in and level it off. Press down gently — firm enough for good contact between particles, but not packed tight.
Optional casing layer. Add a thin (1-2 cm) layer of plain, pasteurized coir on top. This maintains surface humidity and can improve pinning uniformity. Not required for oyster mushrooms but helpful for many other species.
Close the lid. If you're running a modified tub, make sure the polyfill is in place. If unmodified, snap the lid on securely.
Colonization Phase
Now you wait. This is the hardest part for new growers — you need to leave the tub alone.
Conditions During Colonization
- Temperature: 21-24°C (70-75°F) is ideal. Warmer temperatures speed colonization but increase contamination risk. Cooler temperatures slow things down but tend to be safer.
- Light: Not required during colonization. Darkness is fine. Some ambient light won't hurt.
- FAE: Minimal during colonization. If using a modified tub, the polyfill provides enough passive exchange. If unmodified, keep the lid latched.
- Humidity: Don't mist. The substrate should have enough moisture from preparation. Opening the lid to mist during colonization introduces contaminants.
Timeline
- Days 1-3: Little to no visible growth. The mycelium is establishing around each grain point.
- Days 4-7: White patches appear, spreading outward from each grain.
- Days 7-14: Patches merge. The surface becomes increasingly white.
- Days 10-21: Full colonization. The entire surface should be covered in white mycelium.
The exact timeline depends on species, spawn rate, and temperature. A 1:2 ratio at 24°C (75°F) might fully colonize in 10 days. A 1:4 ratio at 20°C (68°F) could take three weeks. Check our mushroom growing timeline for species-specific expectations.
Do not open the tub during colonization. Just don't. Look through the clear walls. If you see healthy white mycelium spreading, everything is fine. If you see green, blue-green, or black patches, that's contamination — opening the tub at that point would only spread spores.
Triggering Fruiting Conditions
Once the surface is 75-100% colonized, it's time to trigger fruiting. The mycelium needs environmental signals to shift from vegetative growth to mushroom production.
The Fruiting Triggers
Fresh air exchange: This is the primary trigger. Mushroom mycelium produces CO2 as it grows. During colonization, the elevated CO2 level signals the mycelium to keep spreading. When you introduce fresh air, the drop in CO2 tells the mycelium it's reached the surface and it's time to fruit.
- Modified tub: Adjust the polyfill to allow more airflow. Some growers pull out a small amount from each hole.
- Unmodified tub: Flip the lid upside down or offset it by 1-2 cm. This creates gaps for air exchange.
Light: A gentle light cycle (12 hours on / 12 hours off) helps orient mushroom growth upward. Mushrooms don't photosynthesize, but they use light as a directional signal. Ambient room light or a small LED is plenty. Direct sunlight is too much — it heats the tub and dries out the substrate.
Humidity: Maintain 85-95% relative humidity at the surface. The substrate itself provides most of this humidity. In a properly prepared monotub, you may not need to mist at all. If the surface looks dry (no tiny water droplets visible on the substrate), give it a light mist with a spray bottle. Never mist directly on pins or developing mushrooms — mist upward and let the mist fall, or mist the sides of the tub.
Temperature: Most gourmet species prefer a slight temperature drop for fruiting compared to colonization. Oyster mushrooms fruit well at 10-21°C (50-70°F). Lion's mane prefers 15-20°C (59-68°F). Check our temperature guide for your species.
FAE Management
Getting FAE right is the most common challenge with monotubs. Too much FAE dries out the substrate. Too little causes:
- Fuzzy feet — elongated, hairy stems that indicate high CO2
- Long, thin stems — mushrooms stretching toward fresh air
- Slow or absent pinning — the mycelium doesn't receive the fruiting trigger
Signs your FAE is right: mushrooms with clean, defined stems, caps that develop normally, and substrate that stays moist but not waterlogged.
If you're running an unmodified tub, you may need to fan the tub briefly 2-3 times per day. Open the lid, wave it a few times to exchange air, close it. Takes 30 seconds.
Harvesting from a Monotub
Harvest timing matters. For most gourmet species, you want to pick just before or as the caps flatten out. For oyster mushrooms, harvest when the cap edges are still slightly curled. For lion's mane, harvest when the spines are 0.5-1 cm long and before the edges start to brown.
How to harvest: Grab the mushroom cluster at the base and twist gently. It should break away cleanly from the substrate. You can also use a clean knife to cut at the base. Remove any substrate debris from the base of the cluster.
Don't pull up substrate. Yanking mushrooms straight up can tear chunks of substrate out, creating holes where contamination can enter. The twist-and-pull technique avoids this.
Second and Third Flush
After your first harvest, the substrate can produce additional flushes — often 2-4 total.
Remove all remaining stumps and pins that didn't develop. Leaving old tissue on the surface invites contamination.
Soak the substrate. Some growers "dunk" by pouring clean, cold water directly into the tub until the substrate is submerged, waiting 6-12 hours, then draining. Others simply mist heavily for a day or two. The purpose is to rehydrate the substrate for the next flush.
Resume fruiting conditions. Within 7-14 days, you should see a new set of pins forming.
Each subsequent flush typically produces less than the previous one. The first flush is usually the largest. By the third or fourth flush, yields drop significantly and contamination risk increases. At that point, compost the spent substrate and start a new tub.
Monotub vs Martha Tent
Both are popular fruiting setups. Here's how they compare:
| Feature | Monotub | Martha Tent |
|---|---|---|
| Cost | $10-20 | $170-330 |
| Capacity | 1 substrate block | 6-12 blocks |
| Automation | None needed | Humidifier + controller |
| Maintenance | Low (fan/mist occasionally) | Low once automated |
| Best for | Single batches, beginners | Multiple species, scaling up |
If you're growing one species at a time and want the simplest possible setup, go with a monotub. If you're running multiple species or want to scale up production, a Martha tent is the next logical step. Many growers run both — monotubs for experimental batches and a Martha tent for their reliable producers.
Common Monotub Problems
No pinning after 2+ weeks of fruiting conditions: Insufficient FAE is the most common cause. Increase air exchange. Also check humidity (too dry) and light (mushrooms need some light to pin).
Contamination on the surface: Green mold appearing before full colonization usually means the substrate wasn't properly pasteurized or the spawn was contaminated. If the tub is less than 50% colonized and you see Trich, it's typically not salvageable.
Substrate shrinking away from the tub walls (side pinning): This is why some growers use a black garbage bag liner. Without a liner, the substrate shrinks as it dries and creates a microclimate along the walls — dark, humid, and perfect for pins. A liner sticks to the substrate as it shrinks, eliminating the gap.
Mushrooms growing long and thin with small caps: Not enough light or not enough FAE. The mushrooms are stretching toward air and light. Increase both.
Grab a clear tub, a bag of grain spawn, prepare your bulk substrate, and build your first monotub. It's the setup that turns casual growers into serious cultivators.
Need help with your grow? Dr. MycoThumb is our free AI growing assistant — ask about substrates, contamination, fruiting conditions, or any cultivation question. Available 24/7 in the chat bubble at the bottom-right of every page.